Step 8 - Setting up the lights and rendering
To render the scene click Editor, Quick Render, choose your image size (480x360 or 640x480 are best) and click Trace. Click the Lighting tab at the top of the window and change the Intensity from 255 to 200. Then click OK and wait for the Image to render. To save the image click your right mouse button in the image window and click Save As. Choose where to save it and what to call it then click OK.
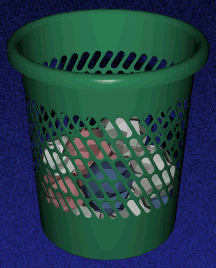 This is what my picture looked like (although I have cropped the image). For the image on the front of this tutorial I just added some more lights by adding an axis (Object, New, Axis) and giving it a light property in it's attributes (Functions, Attributes, click Light tab and enter a value up to 255 in the intensity (I used 50) and click Object is Light Source). I used one light like this to light the back of the object (just move the axis which makes the light). I then copied and pasted this axis and changed the attributes: under the Light tab click the Directionality tab and click Parallel Rays and under the Light, Basic tab choose Cast Shadows. This makes the light like a spotlight instead of like a sun and makes the light cast shadows. I used an Intensity of 255 for this light. Move this light so it shines on the bin from the top left of the screen and is nearer the camera than the bin. As the light is like a spotlight we need to point it at the bin. Rotate the axis so that the y axis points at the bin. Click here to see how I arranged the lights in my picture. Now render the image again as before but this time click the Lighting tab in the Quickrender Settings window and change the Intensity to 150 and click OK.
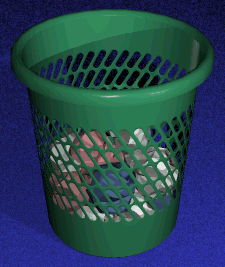 Very nice huh? This render will take longer than the first one as it has more lights and shadows. To get really nice shadows click Soft Shadows in the shadow casting light's attributes. This will take much longer to render but is worth it.
That's the end of the tutorial. Play with the settings and everything I've mentioned to get different results and it will really help you learn the tools. A fun thing to try is using different shaped holes. You can make the holes any shape you want as long and they don't even have to be all the same on one bin. For example you could have a star shaped hole then a moon shape hole as the pattern.
I hope you've enjoyed this tutorial and learnt as many things from following it as I learnt from making it. I would love to hear comments and suggestions on this tutorial and future ones. Was it too hard or too easy, was it too descriptive or not enough? Please e-mail me at cole.family@virgin.net.
I've made a page for people to send me the pictures they make with this tutorial. Please visit this page and send me any pictures you make with this technique.